The ArcMap Plugin tool lets you search and instantly select images of your area of interest according to geographical, temporal and technical criteria (cloud cover, resolution and incidence angle) and visualize them in ArcMap.
You can also view images and request a quotation for selected products in 3 easy steps:
- Search products in the catalogue matching your criteria and covering your geographical area of interest,
- Select images that meet your criteria,
- Use export functions.
The ArcMap Plugin lets you define your area of interest by:
- drawing an area on the map,
- specifying specific coordinate values.
The ArcMap Plugin consists of a toolbar allowing various features.
The feature of each tool is shown in a tooltip. The toolbar is divided in four parts:
- Creation and management of the area of interest (AOI).
- Search tools.
- Exports tools.
- Configurations tools.
The search form is divided on two tabs: Search by criteria and the Search by identifier.
Search by Criteria
Entering search criteria
The definition criteria tab has 4 zones to customize your search, 1 zone for saving your search and 2 action buttons at the bottom.
The customize 4 zones are the following ones :
This search is based on your area of interest, defined in 5 different ways. |
|
Choose your cartographic search type
Using the map
The AOI creation tools allow you to set a search zone on the map in various ways. This AOI will define the geographic area of the search.

|
Rectangle AOI : Lets you create a rectangular AOI with your mouse. You can move the rectangle by dragging it, or change its shape by dragging its corners. |

|
Polygonal AOI : Create a polygon AOI with the mouse. The polygon is moved by selecting it as well as its vertices with ArcGIS tools. The last point is defined by double-clicking. |

|
Point and distance AOI : Create a point and distance AOI with the mouse. The resulting AOI will be the rectangle including the radius set by the user. |

|
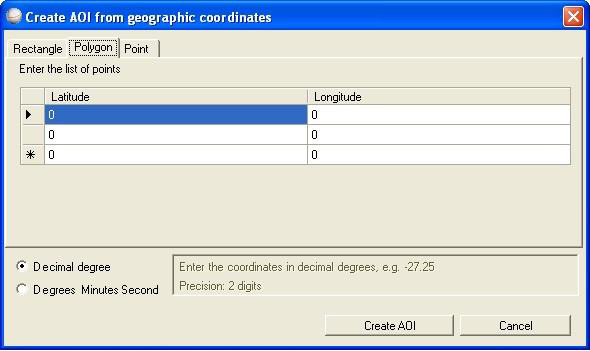
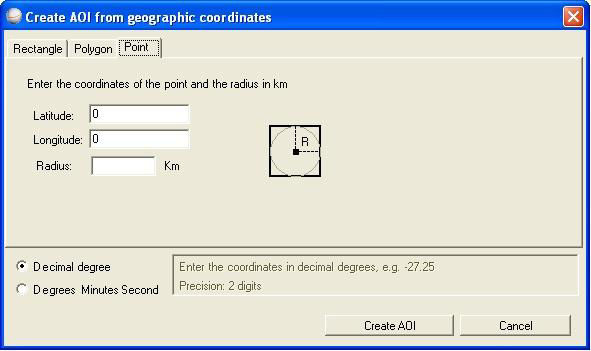
AOI by geographic coordinates : Create an AOI by setting the vertex coordinates to define a rectangle, polygon or circle. Coordinates can be set in decimal degrees or in degrees, minutes and seconds. When you confirm, the polygon is created automatically on the map. For a circle, the created AOI is the rectangle including the circle. |

|
AOI by ArcMap Selection : Lets you create an AOI matching the exact shape of an ArcMap Selection. When you click this tool, a new AOI appears on the map. You can move the AOI or change its shape using the ArcMap tool. |

|
Automatic zoom : lets you zoom in on your AOI. |

|
Remove : deletes the current AOI. |
Search by rectangle
|
First check the coordinate format (decimal or sexagesimal).
|
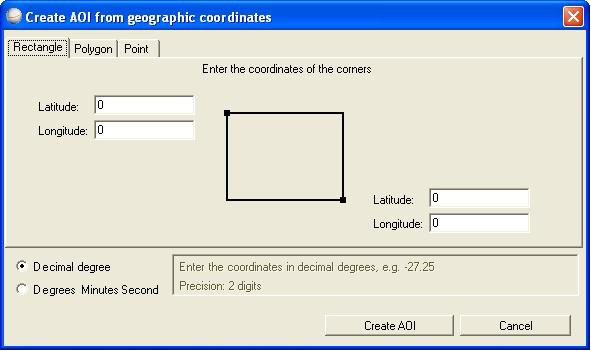
|
Search by polygon
|
First check the coordinate format (decimal or sexagesimal).
To define a point for the polygon:
To modify the coordinates of a point: To delete a point :
|
|
Search by circle
First check the coordinate format (decimal or sexagesimal).
|
|
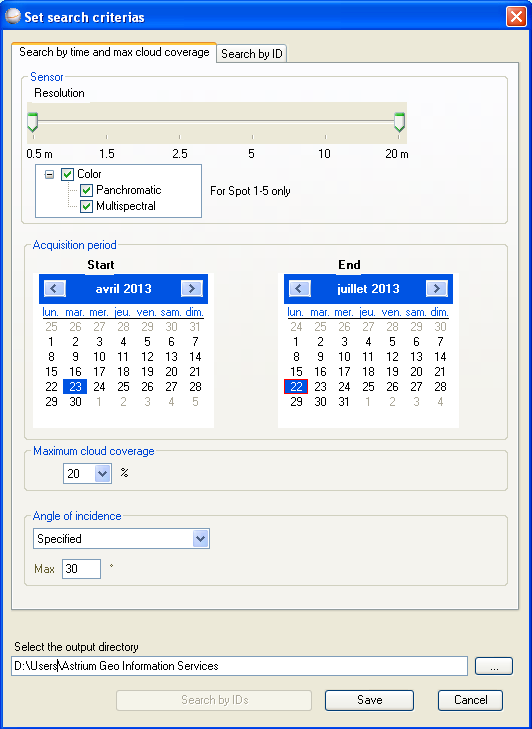
Search Criteria
Resolution
This function lets you run a search by choice of resolution
-
Lick the tool
 Search by criteria.
 - Open the tab « Search by time and max cloud coverage ».
- Choose the resolution range by setting the min and max cursors.
- For Spot data (from 1 to 5), you can also choose the « color » option.
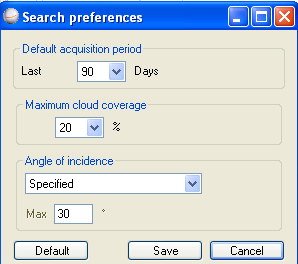
Acquisition Date
You can specify an acquisition interval: enter the start and end dates
-
Click the tool
Search by criteria.
- Open the tab « Search by time and max cloud coverage ».
- In the “Acquisition period” frame, select the start and end date in the calendar.
Cloud Cover
This function lets you set a maximum permissible level of cloud cover (as a %)
-
Click the tool
Search by criteria.
- Open the tab « Search by time and max cloud coverage ».
- Open the Cloud cover drop-down section by clicking its arrow.
- Select a cloud cover value from the list between 0 and 100% (0% = no cloud on the images).
Incidence Angle
This function lets you select scenes according to the angle of incidence, which is the angle between the vertical at the middle of the SPOT scene/ Pleiades data strip and the satellite's position.
The angle of incidence options are:
- Any: Angle between -60.0° and +60.0° (maximum possible with our satellites). This is the default option
- Vertical: Angle between -0.36° and +0.36°.
- Near-vertical: Angle between -7.5° and +7.5°.
- Specified: This item allows you to enter a value below the allowed maximum of 60 ° threshold. Enter your value in the “Max” fields, which appear below the menu when you select this option.
To select incidence angle:
-
Click the tool
Search by criteria.
- Open the tab « Search by time and max cloud coverage ».
- Open the Angle of incidence drop-down section by clicking its arrow.
- In the list of values proposed, click the option that most closely matches your requirements.
- Or click the Specified option. The “Max” fields appear. Enter your required value in this field without the degree unit (°) (e.g. 20).
Validating your Criteria
When your criteria selection is done, you can define the directory where the result of your search will be saved (Select the output directory) and validate by clicking the Save button. You can then click the
 button to start searching..
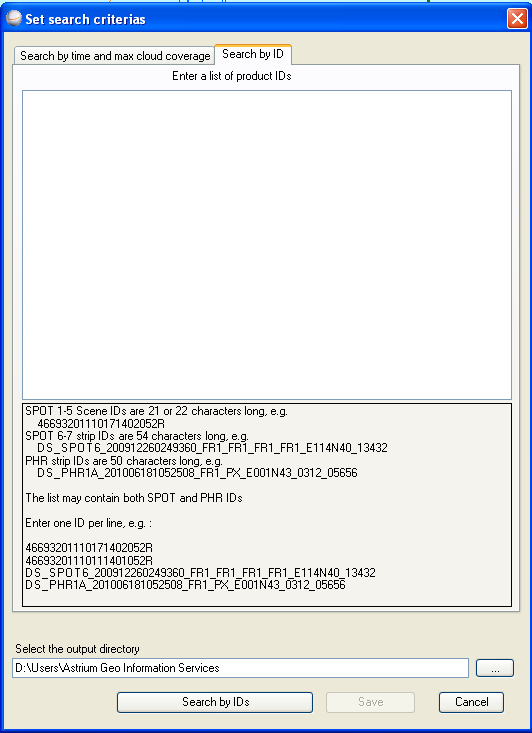
Search by ID
This function lets you run searches by ID code. Once the catalogue search is complete, the corresponding results will be displayed. If this drop-down section is open, it takes precedence over the other sections.
Entering the ID codes
|
1.Click the Search by
A 1/5 SPOT ID can contain 21 or 22 characters. The 22nd character represents the shift along track value. |
|
ID Types
SPOT 1/5 Imagery
For SPOT1/5 imagery product searches, the ID used is the unique A21 code assigned to each scene.
An A21 code looks like this: 20422620611021103321X, where:
- 2 is the satellite number (scene acquired by SPOT 2)
- 042, 262 are the coordinates of the scene on the KJ reference grid (linked to the satellite orbit)
- 061102 is the acquisition date in YYMMDD format (i.e. 2 November 2006)
- 110331 is the acquisition time in HHMMSS format (i.e. 11 hours, 03 minutes, 31 seconds UTC)
- 1 is the instrument number (here: HRV1)
- X is the spectral mode (here: X for multispectral)
- An optional 22th character may indicate the Shift Along the Trace value (1 to 9)
SPOT6/7 Imagery
For SPOT6/7 imagery product searches, the ID used is the unique 54 characters code assigned to each scene.
A 54 characters code looks like this: DS_SPOT6_201303191036210_FR1_FR1_FR1_FR1_W001N39_01952, where:
- DS_ : prefix
- SPOT6: satellite number (6 or 7)
- 201303191036210: data-strip acquisition start date
- FR1 : real archiving center acronym
- FR1 : initial archiving center acronym
- FR1 : real reception center acronym
- FR1 : initial reception center acronym
-
W001N39 : center coordinates
W for Longitude (E or W)
001 coordinate (000 to 180)
N for Latitude (N or S)
39 coordinate (00 to 90)
- 01952 : Number of source frames PA (or XS if spectral mode is XS).
PHR Imagery
For PHR imagery, the ID used is the unique 50 characters code assigned to each product
An 50 characters code looks like this: DS_PHR1A_201206181052508_FR1_PX_E001N43_0312_05656 , where :
- DS_PHR : prefix
- 1A : satellite number (1A, 1B, etc.)
- 201206181052508 : data-strip acquisition start date
- FR1 : initial archiving center acronym
- PX : Spectral mode (PA, XS or PX [i.e. PA+XS])
-
E001N43_0312 : Location of data-strip center with
- E001N43 : center coordinates E for Longitude (E or W)
-
0312 : index of the cell in the PHR-Grid
03 : longitude
12 : latitude
001 coordinate (000 to 180)
N for Latitude (N or S)
43 coordinate (00 to 90) - 05656 : Number of source frames PA (or XS if spectral mode is XS).
Validating your search
To close your search criteria settings, select the output directory where you want the results to be saved.
Search by ID: The search is executed immediately, without any other user action (different from AOI search).
Running a Search
The Search function lets you submit your search request to the server. Once the catalogue search is complete, the corresponding results will be displayed.
Search by AOI
Before running a search by AOI, it is necessary to:
- Define the AOI.
- Set the criteria Resolution, Date range, Cloud cover, and Incidence Angle.
- Set the output directory.
Once these settings are done, click on
Search the catalogue.
An AOI has to respect the following constraints:
- Crossed vertex,
- Area too small (< than 5 km²)
- Area too big (> than 10.000.000 km²)
- More than 1.000 points
Search by ID
The search by id launch is directly made from the “Search by Id” tab.
It is necessary before:
- Enter the list of products IDs
- Select the output directory.
Then, click the Search button to run the catalogs searches.
Displaying results
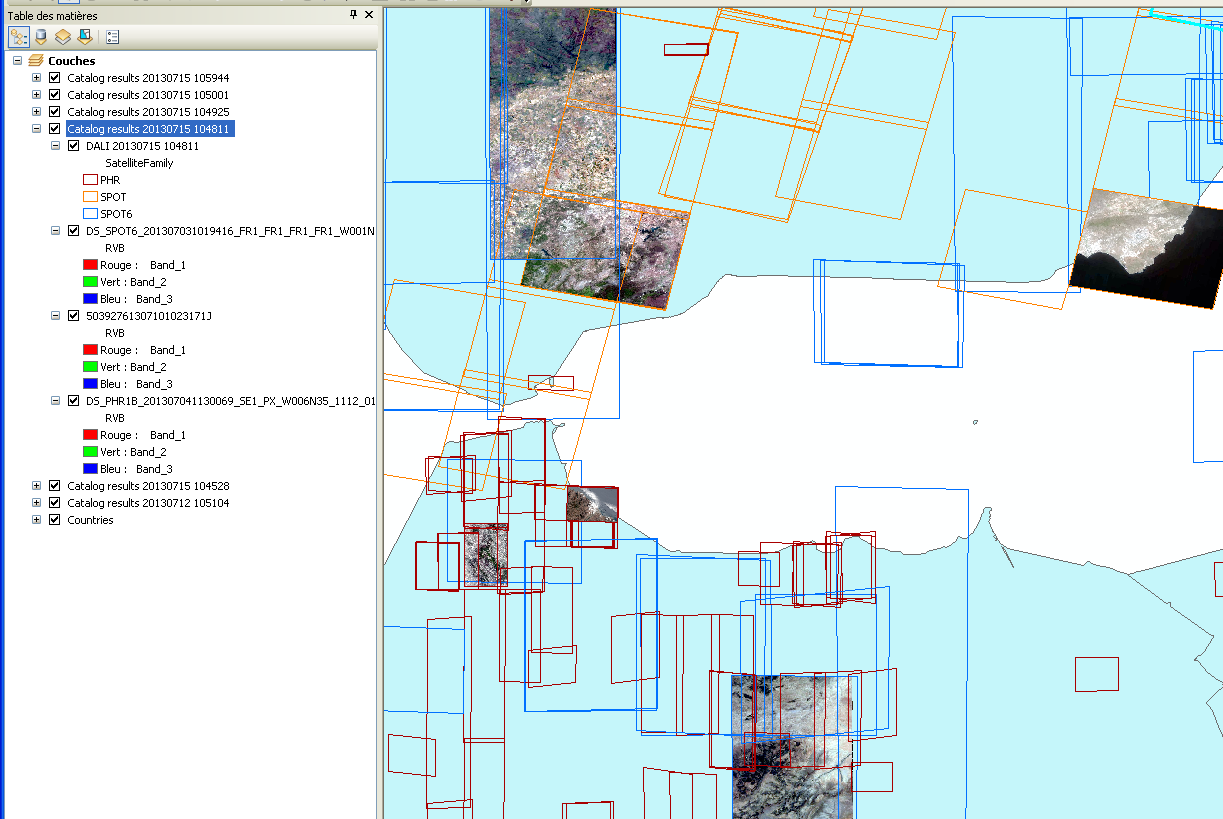
Once your search has been completed, a new layer group is created containing the search result.
Displaying Quicklooks
This function lets you display product quicklooks on the main map.
Click on the tool
 Download and display quicklooks, to display the quicklook on the map.
When using this tool, a selection window appears in order to choose the search result layer group.
Warning, by default, all footprints are shown on the map in case of no product selection.
If you want to download only some specific products, be careful to select only these products before using this tool.
Exporting your Results
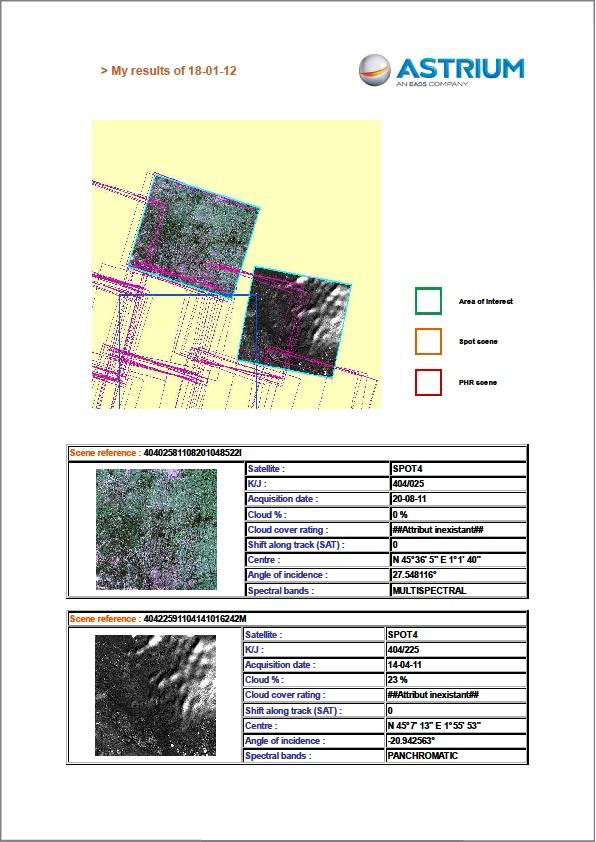
HTML Export
|
By default, all products are exported if no product is selected. If you want to download only specific products, select only these products before using this tool. When the export is done, an html page is shown, containing the result of the export. |
|

KMZ Export
 When using this tool, a selection window appears for you to choose the search result layer group.
You can set the output directory in this window.
By default, all products are exported if no product is selected. If you want to download only specific products, select only these products before using this tool.
When the export is done, the folder containing the result of the export is opened.
CSV Export
 When using this tool, a selection window appears for you to choose the search result layer group.
You can set the output directory in this window.
By default, all products are exported if no product is selected. If you want to download only specific products, select only these products before using this tool.
When the export is done, a csv file is shown, containing the result of the export.
Search Preferences
The search preference setting window lets you define the default criteria.
|
You can specify:
The Default button lets you replace the default values with user-defined values. |
|
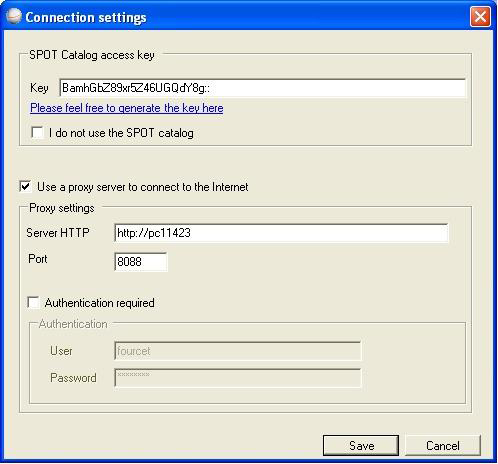
Connection Settings
The Connection settings window lets you define information that will be used for catalogue access. If this information is incorrect, the ArcMap Plugin may malfunction.
|
The user will set:
The Save button validate your user setting. |
|
Interface Language
Select your preferred interface language in the list and click OK.
Online Help
This item allows viewing the table of contents of the online help.
About
The About item allows presenting some information:
- Current version
- Link for contact.